This is part of a series: dd-wrt Repeater Bridge
Thus far, you have successfully:
- Prepared to flash your router with dd-wrt
- Flashed your router with dd-wrt (The “trailed/killer” version, then the “real” one)
Now it’s time to tell your router to connect to another router over Wi-Fi, and act as if the 2 routers are actually 1.
The steps needed will differ depending on the version of dd-wrt. Older versions have a slightly different method than newer versions. So you may find that the steps you need to take are a little different than the steps that worked for me. Some tutorials will cover one, while some tutorials will cover the other.
Of course, before you do this, make sure that there aren’t any problems with your existing network – the one that the DD-WRT router will connect to. Never try to build something atop a half-working system.
From the router’s perspective, here’s what wireless bridging is:
- Connect wirelessly to another Access Point (Wi-Fi router), as if the repeater was any other Wi-Fi capable machine, like a smartphone. This connection is used exclusively for talking with the AP. Nothing else will connect to this router using the main Wi-Fi connection.
- Forward packets coming from its wired LAN ports to and from the other router, as if they were connected by wire
- Pretend to be a second Wi-Fi router (Virtual Access Point). This one is for computers to connect wirelessly to.
- Forward packets coming from wireless clients to and from the other router, as if they were connected directly
- Route packets to and from the router’s own wired and wireless clients
Currently, there isn’t a simple “Setup Repeater Bridge” wizard, so you have to do all of these steps yourself. For the rest of the tutorial, I’ll call the DD-WRT router the “repeater”, and the main Wi-Fi access point the “AP”. These steps work on the particular build of dd-wrt that I have:
DD-WRT v24-sp2 (08/12/10) std-nokaid-small – build 14929
For this tutorial, I reset my router to factory defaults. Before, I had it set up as a repeater bridge. If yours isn’t at factory defaults, and you’re not confident that you can do this perfectly the first time, back up your existing settings in Administration > Backup. If you set wireless security while following the previous post (which you should), it may help to reset anyway. If you’re having trouble making something work, disabling all security technologies often fixes it. This helps narrow down the cause of the problem. Just remember that it’s not fixed until it’s secure again.
- (optional, but probably best) give your computer a static IP
This’ll make life easier if you’re trying to get into the repeater when it can’t connect to the main AP. Normally, you’ll set the main router to give out IP addresses automatically, and the repeater won’t. If something goes wrong, and you can’t connect to the main AP through the repeater, this’ll be a life saver. - Connect to DD-WRT’s default rou
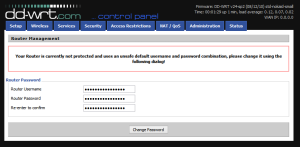 ter IP address: 192.168.1.1
 - It’ll demand that you change the password to something other than the default. Do it. Of course, it’s wisest to pick a strong password.
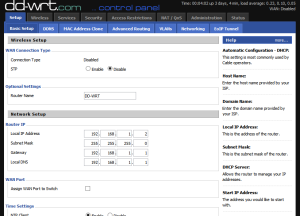
- Go to Setup > Basic Setup
- The first thing I do when setting up a repeater bridge is to change the repeater’s IP to something that’s not already taken. That way, I can avoid any IP address conflicts later. A nice bonus is that I can then use my laptop to connect wired to the repeater, and wirelessly to main AP, and can then google for solutions to my routing problems as I’m fixing them, without needing a second computer. After changing the IP, remember to go to the router’s new IP in your browser.
- Change the default gateway and the “Local DNS” to your main router’s IP.
In computer networking, a “gateway” is the wire/address to take to get to a different network. The “default gateway” is the gateway for all traffic that doesn’t match any other routing rules. DNS converts a website name into an IP address that a computer can visit.
- There should be at least 2 buttons at the bottom of every page of the DD-WRT control panel: “Save” and “Apply”. Some pages have more. “Save” means to remember the settings you’ve changed on this page, putting them into a list of changes to make. “Apply” means to actually save the changes to the router’s onboard flash storage and use them. In this case, since I want the router to have a non-default IP while setting up the router, I click “Apply”. If you want to change settings on multiple pages, and apply them all at once, you must click “Save” after changing settings on each page, before moving to another. If you’re changing settings on 1 page, you don’t have to click “Save” and then “Apply”, you can just click “Apply”.
- You should still be in Setup > Basic Setup
Disable the repeater’s internet connection. It won’t be connecting directly to the internet, so if it tries, it might cause trouble. Also, it’s possible to turn the repeater’s “Internet” port into a normal LAN port, so you can plug 5 things into it instead of 4. Just scroll down a bit and check the box that says “Assign WAN Port to Switch”. - Save current settings. Apply them if you want.
- Go to Setup > Advanced Routing
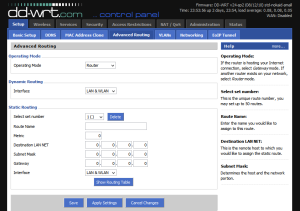
- Change operating mode from “Gateway” (default) to “Router”
I don’t fully understand the difference between these 2. I tried switching the operating mode back to “Gateway” after I had gotten it working, and it appeared to work fine. It’s probably still best to put it in “Router” mode if you’re not planning to use it as an actually gateway to another network. - Set dynamic routing to “LAN and WLAN”
As far as I know, this tells the repeater to not send packets to the main AP if they’re destined to another client connected to the repeater, but instead route them directly to that client. - Save or apply settings
- Change operating mode from “Gateway” (default) to “Router”
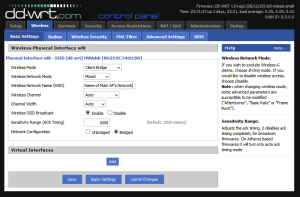
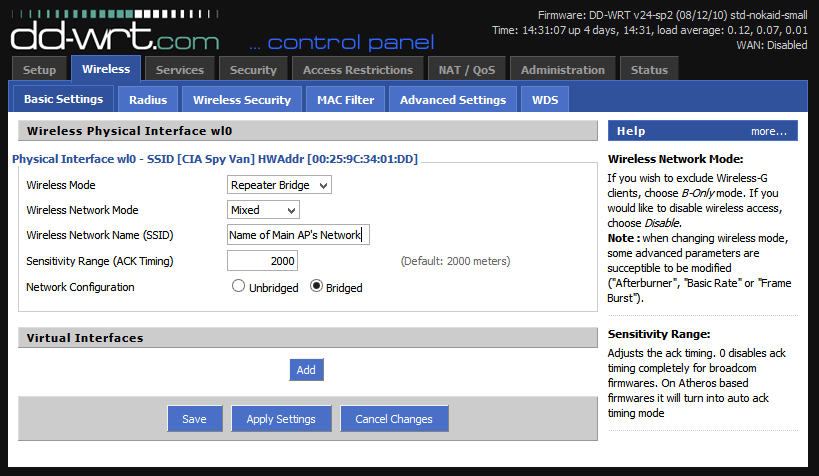
- Go to Wireless > Basic Settings
- Set wireless mode from “AP” (default) to “Client Bridge”. Client bridge mode is like repeater bridge mode, but doesn’t extend the wireless signal of the main router. I say to set this up first because it’s simpler than repeater bridge mode, and thus it’s easier to fix when something goes wrong.
- Set the network name (SSID) to be the same as your main AP
- Set the network mode to whatever the main AP currently uses
- Save or apply settings
- Go to Wireless > Wireless Security
- Make these the same as your main AP
- Save or apply settings
- Go to Security > Firewall
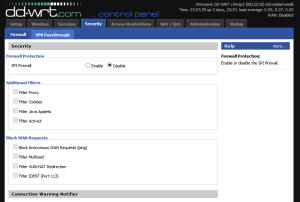
- Uncheck all boxes (probably redundant)
- Disable SPI firewall
Stateful Packet Inspection firewalls only allow traffic in if it’s part of an existing connection, thus making it harder to hack a router from the internet. This router is exclusively inside of a LAN, so it’ll only get in the way. - Apply these settings. You’ll need them for the next step.
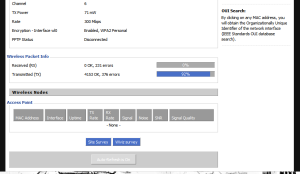
- Go to Status > Wireless
At this point, the router knows it’s supposed to connect to another router, but you haven’t yet told it which one. They way which DD-WRT provides is very unintuitive, and I wish that the devs would improve it.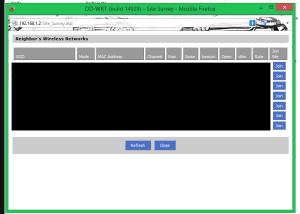
- Click “Site Survey”
A popup will appear, with a list of Wi-Fi hotspots to connect to - Join your AP’s network

- Once it says that you’re successful, click “Continue”
- Click “Site Survey”
- Clicking “Continue” should take you automatically to Wireless > Basic Settings
If it doesn’t, then go there manually.
At this point, you should have a working network. You should be able to reach your AP’s network through a computer plugged into the repeater, as if it was plugged into the AP. Before you continue, I recommend that you make sure that you can reach the repeater, the AP, and the internet. I usually ping the repeater, then the AP, then google.com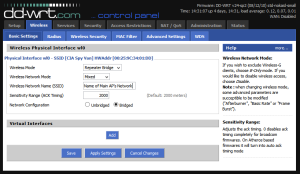
- Change the wireless mode from “Client Bridge” to “Repeater Bridge”
- Apply the setting.
You should now see the option to add a virtual interface. This is what wireless devices will connect to. I think that you might sometimes see this option before setting “Repeater Bridge” mode, but I haven’t looked into exactly when it does and doesn’t show up. - Add a new virtual interface. Make sure that “SSID Broadcast” is on, “AP Isolation” is off, and “Network Configuration” is bridged.
- If you want wireless devices to automagically switch between the AP and the repeater, to whichever is the strongest signal, then set the network’s name (SSID) to be exactly the same as the AP’s. Make sure that even the case of the letters is the same. Be warned, though, that this is not a perfectly transparent abstraction. In my experience, hopping between APs like this will kill TCP connections, so downloads and many other things get broken. For a truly transparent bridging system, check out WDS (Wireless Distribution System, found in Wireless > WDS). The problem with it is that you’ll generally need all routers to be of the exact same make and model, or it won’t work. Repeater bridging with DD-WRT doesn’t need any support from or changes to the AP. I’m setting the SSIDs to be exactly the same.
- Save or apply
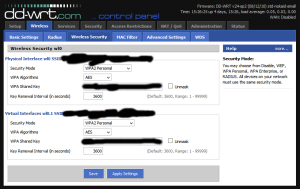
- Go to Wireless > Wireless Security
- Setup wireless security. If you want to be able to hop automatically between the AP and the repeater, make sure that these are exactly the same. Otherwise, you don’t have to.
- Apply settings
- Test the network, and make sure that it works fully.
- Cleanup
Here are a few miscellaneous things that I do,in addition to setting up wireless bridging.- Setup > Basic Setup
Check the box “Assign WAN Port to Switch”
This allows me to use the repeater’s internet port as a normal LAN port, allowing me to plug 5 things into it at once. - Setup > Basic Setup
Automatically update router’s clock using NTP (Network Time Protocol) - Services > Services
Turn off DNSMasq
This is a combined DNS/DHCP server, and the repeater does neither - Services > Services
Disable telnet
telnet is an old remote shell with minimal security and no encryption. It’s vulnerable to man-in-the-middle attacks, and an attacker can easily sniff your login and password when you login. - NAT/QoS > UPnP
Set to clear port forwards on startup, and disable port forwarding. The first one is probably redundant, but it can’t hurt. When UPnP (Universal Plug and Play) is disabled, this setting is greyed-out. To get to it, enable UPnP, then set to clear port forwards on startup, then disable UPnP again. UPnP is used by network programs to automatically forward required ports to allow them to work. Some console games use it. However, the main AP already has UPnP, and it’s the one that’s connected to the internet. If the repeater intercepts UPnP messages from computer behind itself, they won’t get to the place they need to go. - Administration > Management
I used to only allow HTTPS connections to the router, but this time, no web browser that I had would let me. They all (Firefox, IE, Opera, Safari, Chrome, and Seamonkey) said that they couldn’t verify that the router was who it said it was, and didn’t give me an option to bypass. I had to reset the router and start again. - Administration > Management
Enable info site password protection
If a hacker wanted to hack this router, it’d be best to not give them any more info than necessary. - Administration > Management
Disable info site MAC masking
This page is already password protected, so if an attacker gets in here, I’m already PWNed - Administration > Management
Only allow IPs from the local LAN to access this control panel
If this is set to allow any IP, I could easily imagine someone managing to get access to this router from the internet. - Administration > Backup
Back up your settings. If you botch something later, it’ll be nice to be able to return to this point.
- Setup > Basic Setup


If you’ve made it this far, congratulations! You just squeezed an advanced feature out of a router that it was never designed to have!

Very nice and detailed.
Appreciated.
LikeLike
Thanks!
LikeLike
Thanks for the guide …. I got it working in ‘Client Bridge’ mode (hard wired PC) …after… I changed my wired I/P V4 settings from the static I/P address described in step 1 to the ‘obtain an I/P address automatically’. After that I/P address change I was able to access the repeater, my main router and the Internet just fine from my wired PC. I am not having any luck with ‘Repeater Bridge’ – I can connect to the repeater wirelessly and see the DD-WRT menus for the repeater but I cannot get to my main router nor can I get to the Internet. I saw another post talking about reducing the wireless key renewal from the default of 3600 seconds down to 15 seconds on both the repeater and the main router. I tried that but there was no change. One snag could be that my main router is running Tomato while the repeater is DD-WRT.
LikeLike
Hi Roger,
I find it interesting and a bit weird that you only got the client bridge to work with DHCP, and not static IPs. Is it possible that when you set the static IP, you picked an address that was outside the subnet of the router you were connecting to? Also, did you give the client bridge the exact same subnet mask as the router you were connecting to? Either of these would prevent the repeater from working properly.
I’m not sure what caused your issue, but I know that it was maddeningly difficult for me to get a repeater bridge set up the first time (and also fairly hard the second time).
What I eventually had to do was reset the router and start over. In my case, I probably made a simple mistake that I was blind to, and resetting wiped out that mistake. I suspect that you are running into the same kind of problem. I think that your best bet is to try the same fix I did – reset and start over.
Also, if you do decide to start over, take your time and double check each thing you’re doing. If you don’t understand why you’re doing it, or if you find yourself breezing through it automatically without thinking, that might be where you’re missing something.
LikeLike
Hello Erik. I followed your instructions, the router 2 connected on router 1, but I can’t ping the router 2 and even connect at router´s 2 SSID.
LikeLike
Hi Thiago,
I can’t take a look at your setup, but I’m guessing that you made a mistake somewhere. As I said to Roger in the previous comment, this was maddeningly difficult for me to get set up the first time. What I ended up having to do was wipe the router’s settings and try again.
LikeLike
Thanks a lot, nice and helpful description!!!
LikeLike